My C64 Build

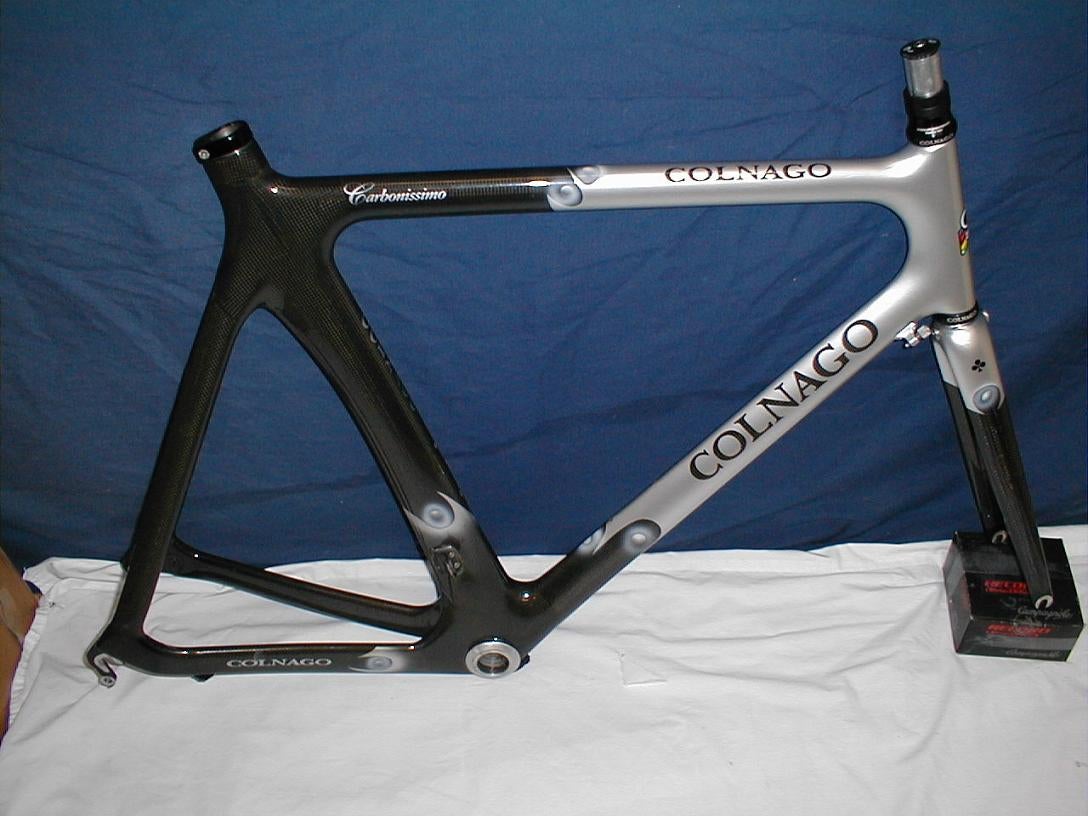
So my C64 frameset arrived the week after Thanksgiving 2021, which was earlier than I was expecting and after only a four month wait. I took everything out of the box. The frame was nicely packed with a styrofoam piece at the top that held the fork and saddle clamp and kept the frame in place during transit. The seat post was in a box of its own and there was an accessories box and two water bottles and bottle cages I’d ordered with the frame. These were loose in the box but unlikely to move due to all the packaging.

There were a couple of things I noticed. The most concerning was that the brake bosses seemed to be missing from the fork, as though the inserts hadn’t been installed.

Also, the accessories box that contained all the fittings I needed to build the bike was for a disc brake frameset.

This mattered, because it meant I didn’t have the fittings needed to fit the rear brake cable through the top tube. Also it didn’t have the compression fitting for the fork/headset (it’s moulded into the fork for disc brake framesets) and the stem cap and bottom spacer seemed to be for a Colnago R41 stem. With the C64 disc frame, the brake hoses can be hidden inside the bars and stem, but it appears that a R41 stem is required for this.

One nice touch is the Colnago bottle cage bolts that are provided with the frame:

I contacted Maris from Brava Cycles where I had bought the frameset, and he explained that Colnago had started sending out forks with the brake bosses painted over. I just had to dig out the paint covering the holes with a small screwdriver. It came off easily and cleanly in one piece. He also apologized that I’d been sent the wrong accessories box and he sent out the rim brake accessory set I needed.

I’d bought a set of direct mount brakes and a Prologo M5 saddle off eBay, Deda Superleggera bars and a Superleggero stem from Chain Reaction and Merlin Cycles respectively while I was waiting for the frame. I started the build with the components I had, along with the wheels from my V1-R. The plan was to use these wheels for the C64 and buy another set, probably Campagnolo, but model TBD, for the V1-R.

One thing that’s unique with the C64 frame is that the bottle cage on the downtube is fitted into a recess for some reason – referred to by some as a ‘swimming pool’. This limits the bottle cages that can be mounted without the use of spacers, but the Colnago water bottle cages I bought with the frame fitted without a problem and without spacers. The tag with the serial number is riveted here also.

The seat post clamp is a wedge inside the seat tube, which seems to work very well, and it’s tightened by an M4 bolt underneath the top tube, which is very neat.

Next I had to decide what components to buy, my short list being Campagnolo 12 speed Record or Super Record. Campagnolo’s electronic shifting (EPS) is only offered with Super Record, it would have been significantly more expensive than a mechanical groupset. The reviews I’d read were praising the 12 speed mechanical groupset while reviews of the EPS groupset were a little lackluster. After some deliberation I bought a set of Super Record 12 speed shifters from Merlin Cycles (at a price similar to Record at other online retailers). I found really good pricing at Pro Bike Kit and bought Super Record front and rear derailleurs and a Super Record chain. A new cable set was bought from Excel Sports, although I later realized that the shifters included cables.

All these parts and the rim brake accessory box arrived in time for the weekend, which happened to be a weekend where my wife and daughter were away, so I had plenty of uninterrupted time to continued the build, and could do so in the warmth and comfort of the family room.

On both my CX-1 and V1-R the shifting has never been perfect, there have always been a couple of sprockets where I could never get the upshifts and downshifts dialed in. It would hunt in either direction – add more cable tension and it would shift to a larger sprocket but hesitate when shifting to a smaller sprocket, and vice versa. This could be due to cable friction, so I was going to ensure that this wouldn’t be an issue with my C64.

A member (who went by the name ‘Calnago’ – now sadly passed away) had written a great and very extensive thread on the C64 frame and build on the Weight Weenies Forum which I found very informative and helpful in researching my build.

One thing he covered in length was the cable routing around the head tube. With the C64 (and other current Colnagos – V3R, G3X), the derailleur cables are routed internally through the downtube entering on top of the downtube towards the front. According to Colnago, the cable for the rear derailleur enters from the right (right shifter to right hand side) and the front derailleur cable enters on the left (left shifter to left hand side). On the forum, Calnago had an issue with this because 1) the cable hosing would rub on the head tube and damage the paint (and he didn’t see how the rubber frame protector on the cable would stop this) 2) this routing would lead to a tighter bend in the cable that could increase cable friction.

Image

His preferred approach was to route the cable from the right shifter to the left entry to the downtube (and vice versa) and let the cables cross in the downtube. The benefits he claimed were that this would avoid the cables rubbing on the headtube and the wider bend would reduce cable friction.

Image

Incidentally, that is what’s done in this build (see 5m:25s in):

I routed the cables this way at first, but I didn’t like it. Despite keeping cable length to a minimum while ensuring the bars could turn without pulling on the cables, there was too much loose cable at the front of the bike. It didn’t look good and there was too much opportunity for the cables to get caught by something, or for my knees to hit them, which would be annoying.

I reverted back to the standard routing using Jagwire Mini Tube Top protectors, which I thought was a much more elegant solution (I would have liked to have used the Colnago cable protectors as shown on the white and black C64 above, but couldn’t find any).

One benefit of rerouting the cables, is that it gave me opportunity to check that the cables weren’t dragging on anything and cable friction was at a minimum. The cables ran freely. I paid particular attention to where the inner cable entered and exited housing that had been cut. I’d made the ends of the cable housing round again after cutting by inserting a bradawl, but sometimes the inner cable can still feel tight. They were nice and smooth now passing freely into and out of the housing. Also I found it better to insert the housing into the shifters before feeding the cable through the internal routing of the Deda handlebars. This ensured that the cable housings were seated and installed in the shifters properly – any movement between the housing and shifter could also affect shifting consistency

The bottom bracket cable guide is moulded into the carbon on the C64, which is a nice solution, but requires nylon tubing to prevent the cables from digging into the carbon and it also helps keep dirt away from the cable. There was no explanation in the Colnago assembly manual about it, although some tubing was included in the accessories box for this purpose. I followed the recommendation from the Weight Weenies thread, and purchased some tubing from Amazon which worked very nicely.

The last note on the subject of cable routing is that Colnago included a Jagwire cable end with an extension in the accessory box. It wasn’t obvious to me where this would be used. It’s used where the rear derailleur cable exits the chain stay with the extension inside the chain stay, and is a nice way of preventing the ingress of dirt into the cable.

Brake cables were easily installed, the only thing remarkable was that the fittings that act as end stops for the cable ends in the top tube, clip in to the frame. I was worried about either breaking them or damaging the frame. There were no issues but there seemed to be more movement with the rear fitting than I would have expected.

Image

One of the more difficult decisions I had was around the chainset. A Super Record chainset is ridiculously expensive and twice the cost of a Record chainset. The technical differences are that the Super Record chainset uses a titanium axle compare to steel on the Record, the Super Record has a carbon ‘brace’ that adds some stiffness to the large chainring when on the smaller sprockets of the rear cassette, and the Super Record chainset uses CULT ceramic bearings, which apparently are very high quality. Also, the Super Record chainset uses a bolt with a left hand thread to join the two halves. I’ve read that this is done to avoid a steel bolt being used which could lead to galvanic corrosion between the steel and titanium.

90 g of the 150 g weight difference between the Super Record and Record groupset is in the chainset. For me, what was more important was that, to my taste, the Super Record chainset looked much nicer than the Record. Also it seemed appropriate that the top frameset got the top components – it’s supposed to be a superbike after all.

Record 12 speed chainset
Super Record 12 speed chainset

After much deliberating and searching for the best price, I bought a Super Record chainset from Chain Reaction Cycles. Chain Reaction Cycles seems to change their prices periodically without it being obvious. When I first looked, there were other retailers with better pricing, but when it came time to pull the trigger, Chain Reaction suddenly had the best price. I’ve seen the same in the past on other components I was looking for.

One thing I found was that most places had 172.5 mm chainsets, but some didn’t have any 175 mm. Merlin Cycles had the best pricing, but only had 172.5 mm. I’ve never had a bike fit so I don’t know that 172.5 mm cranks won’t work for me, but I’ve never had a problem with 175 mm cranks and all my other bikes have 175 mm cranks. It wasn’t worth the risk of buying 172.5 mm cranks to save a few dollars and finding a problem in the way they felt or worse still, start suffering from some kind of pain while cycling. It’s worth noting that 175 mm is considered the standard crank length for mountain bikes and 172.5 mm is considered the standard length for road bikes. I’m 6’4″ and I used to use 180 mm cranks on my mountain bike.

The other thing I found was that not many places offered 53/39T cranksets, which is what I’d always run on my road bikes, however I didn’t think it to be an issue going with 52/36T which were much more available. I could see where the lower gearing of the smaller chainring could be a benefit, and a 52T large chainring wasn’t going to limit me in any way.

The next decisions were around the cassette. There were two decisions to be made, gear ratios and Chorus vs Super Record (there is no Record 12 speed cassette). The gear ratio options were either 11-29 or 11-32 (Chorus also has an 11-34, which might need the Chorus rear mech, I wasn’t interested in that so didn’t look into it). My 11 speed setup on the V1-R has an 11-29 cassette. The 12 speed 11-29 cassette would add a 16 tooth sprocket that is missing between the 15 and 17 teeth sprockets on the 11 speed cassette. The 11-32 would also add the 16 tooth sprocket but extend the last four sprockets out to 32T going 22, 25, 28, 32 compared to 21, 23, 26, 29 on my 11 speed bike. This seemed a better option, and I’ve had no problem with the wider gear spacing for the lower gears on my Ekar 9-42 cassette. The difference between Super Record and Chorus 12 speed cassettes is that with Super Record the largest 6 sprockets are titanium whereas Chorus uses steel. Super Record is almost twice the price and titanium sprockets are less durable. The weight savings is over 50 g, but I wasn’t out to build the lightest bike -just the nicest – so I went for Chorus and saved the money.

Parts arrived, I pressed in the BB86 bottom bracket cups I’d bought earlier, and installed the crankset and cassette.

I shortened the chain (according to the Campagnolo maximum chain length rule) joined it with a KMC Missing Link, installed my favorite SuperCaz bar tape, adjusted the gears and I was done.

In an earlier draft of this blog, I wrote at length about using quick links on Campagnolo chains rather than the recommended pin. I’ll just say that if you chose to use the pin as Campagnolo recommends, you should use the appropriate Campagnolo tool, not a third party tool. I personally prefer to use a quick link and I think this article does a good job of explaining why and why it should still be ok to use a quick link rather than a pin to join the chain. This whole topic sparked some lively debate when I posted on the Campagnolo Tech Talk group on Facebook.

Here are a few photos of the finished bike.

How I Came to Love Colnago Bicycles

Although I started cycling as a mountain biker, I took an interest in the Tour de France, and became an avid follower during the Lance Armstrong years, which made me at least appreciate road bikes and road cycling.

Colnago was a name I knew through following The Tour, but back in the UK when I was considering buying a road bike I had my heart set on a Bianchi. I loved the look of the celeste and yellow Bianchi Marco Pantani was riding, and I could get an aluminum Bianchi painted in similar colors for around £1500.

Marco Pantani on his yellow and celeste Bianchi

A couple of years later I was living in the US and I’d bought a Yeti road bike from my friend Joe who worked for Yeti Cycles.

My Yeti Road Project

One Saturday afternoon I was in the bike store ‘Two Wheel Tango’ in Ann Arbor. They were a Colnago dealer and had a Colnago Carbonissimo frame hanging on the wall. It was both the most expensive and the most beautiful bike frame I’d ever seen. I think I was mesmerized by the carbon fiber weave and how perfect the frame looked. That must have been either 2000 or 2001 and I remember the frame being on sale for around $7,000, which is a lot of money now in 2022, and ridiculously expensive back then. That put Colnago on a very high pedestal for me – very desirable but out of reach – but that didn’t bother me because I would have been dreaming about buying the latest full suspension Yeti mountain bike back then rather than a different road bike.

62 cm COLNAGO CARBONISSIMO | Road Bike, Cycling Forums
Colnago Carbonissimo Frame

Between 2002 and 2004 I was working as an engineer on the Alfa Romeo variant of the General Motors High Feature V6 engine. This entailed monthly trips from the US to Alfa Romeo in Italy who at that time were located just North West of Milan in a small town called Arese. On one of the trips in 2002 I had a couple of hours to kill before I needed to head to the airport for the flight home, so I decided to visit the Colnago factory in Cambiago which is North East of Milan. I figured it wasn’t too far from Alfa Romeo and even though it was taking me the wrong direction, I could still get to the airport in time. This was before the days of satellite navigation in cars and iPhones with GPS apps, but I found Cambiago on a map and fought my way through Friday afternoon traffic to get there.

I wasn’t quite sure what to expect. The factory/headquarters building was relatively small, on what I remember being an otherwise residential street. I arrived unannounced, hoping that they might let me take a look around, or at a minimum let me have a look in what appeared to be a showroom. I’d visited the Yeti factory numerous times in Golden, Colorado, and in 1998 I visited the GT factory in Santa Anna, California. The front of the building where the workshops were, had open doors so I could see in, which is how I got the photos below:

Entrance to the Colnago Headquarters
A bike workshop at Colnago
What looked to be a showroom at Colnago
It was the Schumacher era at Ferrari and there were a lot of Ferrari branded Colnagos at the time, including mountain bikes
What appeared to be a test lab for testing frames
Offices

After standing gazing in for a while, one of the Colnago staff members came to see what I wanted. I asked if I could have a look around. It became obvious they weren’t used to entertaining visitors – especially those who show up unannounced – he gave me a very nice hardbound book/catalogue, and politely asked me to leave.

So much for that, but oh well – nothing ventured, nothing gained – and it was still nice to have seen what I had seen.

In 2017, I started getting back into cycling after a hiatus due to family life and golf. In the spring I started riding my road bike while the trails were drying out, and I realized how much I was enjoying it. My Yeti Road Project was ok, but at that stage it was 16 years old and I started thinking about a change. That got me thinking about Colnagos and wondering if one could be had for a reasonable price used. I found a Colnago C50 frame for sale on eBay which seemed reasonable, but I was concerned it might be just that bit too small, compared to the geometry charts for my Yeti. I kept searching and after missing out on a Colnago M10 frameset, that looked great, I scored an incredible deal on a Colnago CX-1. The CX-1 has a monocoque front triangle with a lug and tube rear. It was Colnago’s race bike when it was introduced, and after an EVO model was replaced by the M10 which in turn was replaced by the V1-R.

I built up the CX-1 with the 9 speed Ultegra components and Mavic Ksyrium wheels from my Yeti Road Project, which meant I only needed to buy bars, stem, cables, bar tape and a braze on front mech (the mech front mech on the Yeti used a clamp). I also picked up a used Colnago Selle Italia saddle on eBay for $25. The bike as pictured below cost me less than $1,000 (excluding the value of the carry-over Ultegra components):

My CX-1 with its original Ultegra 9 Speed Build

It was a big step up from the Yeti, it was lighter and more responsive, but importantly not as harsh as the Yeti was on the rough roads I ride. The carbon frame was more compliant than the aluminum frame of the Yeti where it needed to be, but stiff where it needed to be also.

I looked out for bargains on eBay and the online bike stores, and over time I collected all the components I needed for a Campagnolo 11 speed Record build. I had zero knowledge or experience with Campagnolo, but I loved the aesthetics and it only seemed right to have Campagnolo on a Colnago. Then came a set of Zipp 404s, which were great wheels.

The Ultegra components and Mavic wheels went back on to the Yeti which became a spare bike and has since been mounted to my Wahoo trainer apart from the occasional outing.

I thought the CX-1 was a superb bike and I had it spec’d just as I wanted it (I remember deliberating for hours deciding which water bottle cages would best suit the bike – I ended up with FSA carbon cages that were black/white/red). I rode it for around 5,000 miles, I did my first century and other notable rides on it.

I was now more of a ‘roadie’ than a mountain biker, realizing that the time I would have previously spent in the car driving to a mountain bike trail to ride, could be better used to ride my road bike from home – and time was limited due to my commitments as a family man. I was also enjoying group rides with the R3 cycling club I’d joined in the Spring of 2018.

The CX-1 was great, but there’s always something better – the next bike. For me that was a Colnago Concept, which was their aero bike. I thought the Concept was a cool looking bike – in certain colorways – in others looked a but ‘dull’. My favorite was the black and gold art decor colorway, which was my dream bike at the time, and anything but dull.

Colnago Concept in CHDK

I looked for months, but couldn’t find a Concept frame with rim brakes (I didn’t want the expense of new carbon wheels, and Campagnolo disk brake components seemed very expensive) in my size, at the right price and with a colorway I wanted. It then became apparent that the Concept was being discontinued and there’d be slim pickings, so I started looking at different options.

I found a V2-R frameset for a good price, but it was in matt black (TNBK) which didn’t appeal, and by the time I’d convinced myself it’d be ok, it had sold. Disappointed I’d missed out, and now decided I was getting a new bike (or frameset at least), I kept looking and found a great deal on a new V1-R frameset on bikeexchange.com. I’d been put off the V1-R due to the bottom bracket mounted rear brake, but this was an incredible deal and my favorite of the V1-R colorways. Being a car guy, I must admit that having a bike that was developed in collaboration with Ferrari and having a Ferrari logo on the top tube also appealed.

In time honored fashion, the wheels and components from the CX-1 were used to build the V1-R.

Then, again over time, I searched and waited for the best deals – this time on 11 speed Super Record components. When I had what I needed I rebuilt the V1-R and swapped the Record components back over to the CX-1, so I could use the CX-1 as a spare bike (or second spare road bike, because I still had the Yeti Road Project – but that was my trainer bike)

I’d read of people complaining about the bottom bracket mounted rear brake on the V1-R. The complaints were around servicing and adjusting brake pads, and some complaints about the rear brake picking up more dirt in that location. I’d decided these were issues I could live with, but I found was that I was getting significantly more brake rub when out of the saddle sprinting, or climbing than I was used to with CX-1. I attributed this mainly to the bottom bracket mounted rear brake, but realized it was due to differences in stiffness between frame and the rear wheel, and the V1-R must have been different to the CX-1 in some way. This was bothering me to the extent that I was beginning to regret the purchase. I later found a review on Velonews describing this issue, which made me wish I’d done more research.

I was expecting the V1-R to be an upgrade relative to the CX-1 but how could it be if I was experiencing brake rub, which was zapping power. A fix was to open up the clearance between the brake pads and the rim, but at the expense of braking capability.

After quite some research, it seemed that the Zipp wheels weren’t particularly good in regards to lateral stiffness due to the hubs, which could be contributing to the brake rub issue. I picked up a set of Campagnolo Bora WTO 60s and the brake rub was very much reduced. The Zipps were sold on eBay for more or less what I paid for them two years earlier.

Upgrades also included a Deda Superzero stem and carbon bars, which looked great fitting in well with the squared off tubes of the bike and were very comfortable.

Other than the brake rub issue, which was mitigated by the Bora wheels to the extent that it was no longer a concern, the V1-R has been an excellent bike and has performed very well over the 5,000 miles I’ve ridden it.

Anther passion besides cycling has always been cars. That’s what got my into engineering which made it possible for me to live and work in the US. I always loved AMG Mercedes and in 2013 I was fortunate enough to buy an E55 AMG Mercedes, which had the 5.5l supercharged V8 engine. I owned that for three years and replaced it with an E63. I’d owned that for a couple of years and realized that it wasn’t the most practical car – especially during Michigan winters – and it wasn’t very good at transporting bikes. I concluded that bikes were more of a priority for me than fast cars. The E63 went and was replaced by a two year old Jeep Grand Cherokee. The logic was also that that the money I was saving by having a less expensive car could go towards a dream bike – a C64 maybe!

So by now, I was a bonafide ‘Colnago Fanboy’. As well as riding on the road, I was now riding gravel a lot. I’d been looking for months for either a Colnago Prestige or G3-X to replace the Kona Super Jake I was using to ride gravel. That didn’t pan out and it became apparent that I’d be waiting over a year for a G3-X frame. I ended up with a Look gravel frame and wrote about it here.

I’d been e-mailing a lot with Maris, the owner of Brava Cycles – a Colnago dealer in Latvia – about the availability of a G3-X frame in my size. He seemed very good and his prices were the best I’d seen. I’d also noticed his prices for C64 frames, which didn’t seem that far out of reach. I loved my V1-R, but the C64 was the ultimate superbike in my opinion, and I’d been watching YouTube videos such as this:

I’d seen a C60 frameset in a store before, and I could imagine how incredible a C64 must look, especially in one of the new ‘Frozen’ colorways such as this bike in Frozen red, code RCRD. The Frozen paint schemes are offered in a number of colors, but I really liked the red.

In the spring of 2021, I sold my CX-1 realizing I wasn’t riding it as I had my V1-R, and I didn’t really need two spare road bikes and a gravel bike that could do double duty as a road bike spare. By the summer, I was in a position to order a C64 frameset. I placed the order with Brava Cycles in July and was told it would be a 4-5 month wait, meaning I’d receive the frame in November or December. If I received the frame in December, then I wouldn’t be riding it until March due to the weather, but this would give me time to assemble the components I needed to build it.

After being told that frames were taking longer to arrive from Colnago, and it might be January/February before I see the frame, out of the blue I received an e-mail from Maris saying my frame had arrived and was ready to ship. He also sent me a photo of my frame next to two other Frozen C64s he was about to ship. I couldn’t wait to get my hands on it.

The frame arrived the Monday after Thanksgiving and it didn’t disappoint. Then I built the bike up over the next month or so, here it is finished. I wrote about the build here.